If you have ever experienced a problem with your ceiling fan, like humming sound, slow speed, the fan not running, or the fan light setup is working but the fan has stopped despite having a proper power supply, you have come to the right place because one of the most common causes is a poor or blown capacitor, rather than faulty internal windings, a failed power supply, or jammed bearings, you have come to the right place.
To begin, double-check that you have the right type of new capacitor and also that you understand where it is located. Next, check assured that the power supply has been turned off and is not connected to anything. Once you have gained access to a ceiling fan capacitor, you may begin disassembling the fan. Finally, remove the faulty part, rebuild the fan, and switch on the power supply to complete the repair.
About replacement part
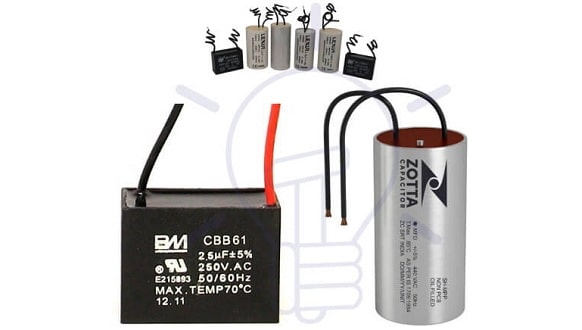
Before you can repair a fan capacitor, one must first determine which replacement part you will be employing. To receive this information, it may be important to speak with the fan manufacturer. Identify the exact location of the component in the unit once you have located the relevant part. A metal housing surrounds the capacitor, which is usually situated between both the light fixture as well as the fan motor in most situations. As well as housing the fan, this housing is often home to the fan’s speed control mechanism.
Make sure the power is turned off
You must turn off the electrical current that is running through the fan when you begin operating. To ensure complete safety, the power should be switched off on the electrical circuit panel. To find out which circuit breaker and fuses are linked to the ceiling fan, switch on the device and unplug each circuit one at a time till the fan loses power. Continue working after you have turned off the electricity for a few minutes to let the fan capacitor to discharge any trapped electricity before continuing.
Remove the light fixture from the fan after it has been disassembled. You must label each cable that you detach to reinstall the fan correctly the next time. Keep all of the screws and electrical hardware in a secure place until you’re ready to reassemble the vehicle. Removing the screws that hold the base part of the metal case together is necessary. Locate the capacitor for the ceiling fan and cut the cables as near to the element as you can manage.
Using cable strip techniques
Use cable strip techniques to cut a little amount of shielding from the wires before connecting them. To use a screw-on and crimp-type wiring nut, connect the wires from the fresh ceiling fan capacitors to the wires from the old capacitor. Perhaps some wire will need to be re-routed to make way for a new capacitor. It is essentially none of the cablings that gets stuck between the base plate and its enclosure. The bottom surface of the metal case should be reattached.
Reconnect the wires from the light fitting to the fan in proper order by reversing the procedure described above. Reattach the light fitting to the fan and double-check that it is properly fitted into the metal housing before turning the fan back on again. Turn on the unit’s power supply by pressing the power button. Check that the fan & light fixture is in proper working order.
This is how you can easily replace the capacitor of your ceiling fan. Follow the above-mentioned steps for easy capacitor replacement.
Related Topics: