During the purchase of a ceiling fan, most people usually go for the most optimal size, colour, and other essential features to grab the best product. The purchase is surely typical and requires consideration of a wide number of aspects, but not getting the installation services from the manufacturer can be devastating.
Usually, limited brands offer free installation with their ceiling fan and if you are also the one, who bought a fan with no installation service, you might be in a quest of installing the fan on your own. The simplest solution to this problem is by finding an electrician and getting the work done by him. Or, you can do the same thing at home.
No doubt wiring the fan seems like a difficult task for a first-timer, but if you pay close attention to the method, it is completely easy. There is a need of considering a few things and then getting started with the wiring. Here is the complete method to install a ceiling fan at home –
1. Remove the Plastic protectors and wraps
New ceiling fans are protected with plastic and poly wraps during the shipping process. These are the small things that can make you feel that installing a ceiling fan is difficult. After removing all the plastic things, it is time to start wiring.
2. Understanding the Colours
Two wires are going to the household ceiling fan from the power outlet. If you pay close attention to the circuit board and the wires at the other end, you can understand it with ease.
- The black wire is always the hot wire, which completes the circuit with the switch. So, this black wire will be connected to the switch at the other end.
- The white wire is always neutral and it is going to complete the circuit. As if your fan is connected to the regulator, then this wire will end in the regulator.
- Green wire is always the ground wire to prevent short-circuit or such other problems.
After understanding the mechanism, it is time to wire the fan and connecting it to the live wires.
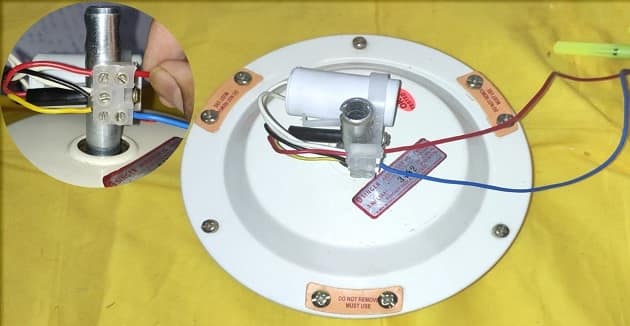
3. Wiring the Fan
As you can find that the fan is already wired by the manufacturer and it is time to install the fan and connecting the right wires.
- Start by installing the fan with the pipe. Once the fan is installed, you have to connect the wires and get it through the pipe.
- The black wire from the main power supply will connect to the black wire of the ceiling fan and do the same with other wires.
- Once all the wires are connected, turn down the canopy and you can use the fan at a low-speed setting to ensure its functionality.
The fan will work perfectly, but if the fan is not wired by the manufacturer, it would be a better choice to call an electrician.
4. User Manual
In case you are using a ceiling fan that has a built-in light, it would be an optional choice to check out the user manual. In most cases, people end up avoiding the importance of the user manual. However, the instructions are clear, and they offer way better support to help you understand that which wire is negative and which one is positive.
Ceiling Fan Connection Demo
Conclusion
Installing the ceiling fan by this method will take less than few minutes, and if you have all the tools to peel a wire and screwdriver to install in the socket, you can do it in less than half-hour. We hope you will have a great experience doing electric work on your own.